Using AI to create an audio driver using an audio feedback loop

I wanted a simple thing: when a package arrives at my door, play a sound effect through the nearest security camera’s speaker. What followed was a deep debugging session involving RTSP backchannels, AAC frame pacing, and spectrogram analysis. Here’s how I got it working.

The Setup

I run about 15 Dahua and Lorex IP cameras around my property, managed through Home Assistant with the Dahua custom integration (installed via HACS). Several cameras have built-in speakers, and the integration exposes them as media_player entities. The goal: trigger a “Hallelujah” sound effect on the camera that detects a package.

Problem 1: No Sound At All

The first attempt produced silence. The media_player.play_media service call completed without errors, but nothing came from the speaker. Time to investigate.

Checking the Hardware

First, verify the camera actually has a speaker:

curl -s --digest -u admin:PASSWORD 
  "http://CAMERA_IP/cgi-bin/devAudioOutput.cgi?action=getCollect"
# result=1 means speaker is present

Speaker confirmed. Next, check if audio encoding is enabled on the camera—a prerequisite for the RTSP backchannel:

curl -s --digest -u admin:PASSWORD -g 
  "http://CAMERA_IP/cgi-bin/configManager.cgi?action=getConfig&name=Encode[0].MainFormat[0]" 
  | grep AudioEnable

AudioEnable=false. That’s the problem. Without audio encoding enabled, the camera won’t advertise a backchannel audio track in its RTSP DESCRIBE response. No backchannel means no speaker output.

The Fix

curl -s --digest -u admin:PASSWORD -g 
  "http://CAMERA_IP/cgi-bin/configManager.cgi?action=setConfig
  &Encode[0].MainFormat[0].AudioEnable=true
  &Encode[0].ExtraFormat[0].AudioEnable=true"

After enabling audio, the RTSP DESCRIBE response now includes a sendonly audio track (trackID=5), which is the ONVIF backchannel the integration uses to send audio to the speaker.

I added detection for this condition to the integration—it now logs a warning at startup if audio encoding is disabled, and provides an enable_audio service on the media player entity to fix it without manual curl commands.

Problem 2: Audio Plays, But Sounds Terrible

With audio encoding enabled, sound came out of the speaker—but it was a garbled mess, compressed into a brief burst. To diagnose this properly, I needed data, not just ears.

Spectrogram-Based Debugging

I set up a recording pipeline: play audio on one camera’s speaker while recording from a nearby camera’s microphone, then generate spectrograms for visual comparison.

Source File

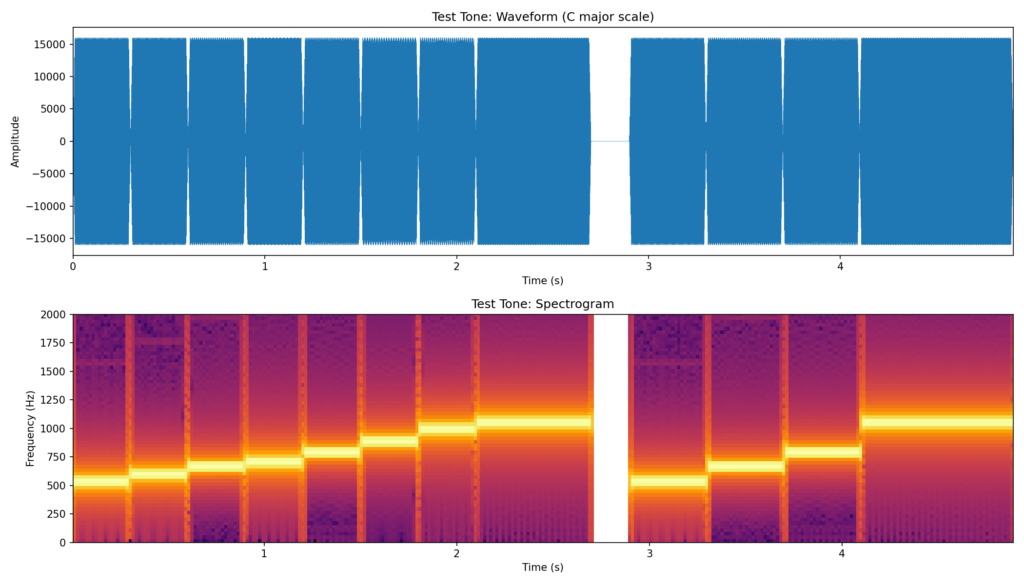
First, I generated a C major scale test tone—its staircase frequency pattern is easy to identify in spectrograms:

Test tone spectrogram showing C major scale staircase pattern
Source test tone: a C major scale with clear staircase frequency steps. Each note is distinct in the spectrogram.

Baseline: AirPlay Speaker

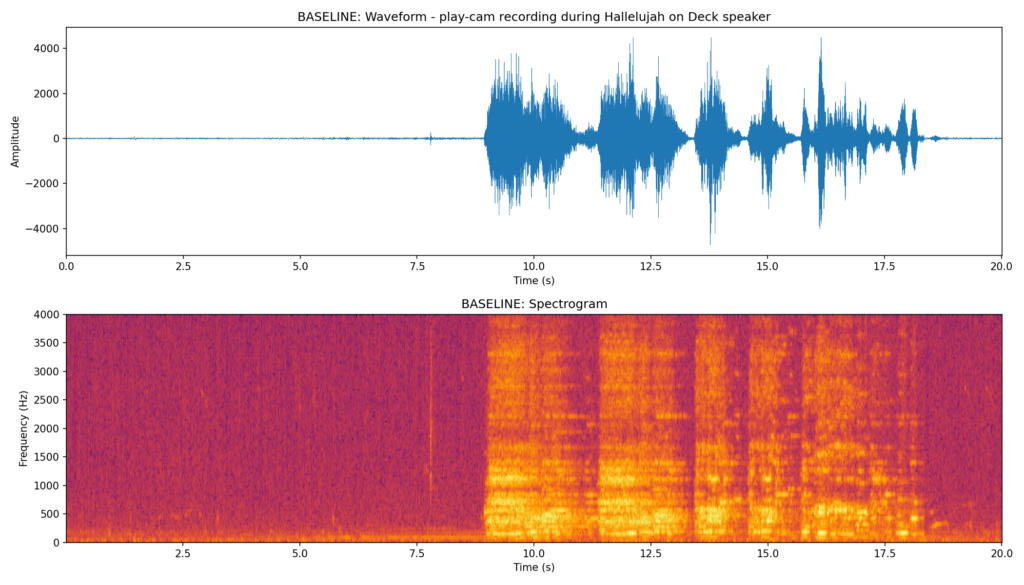
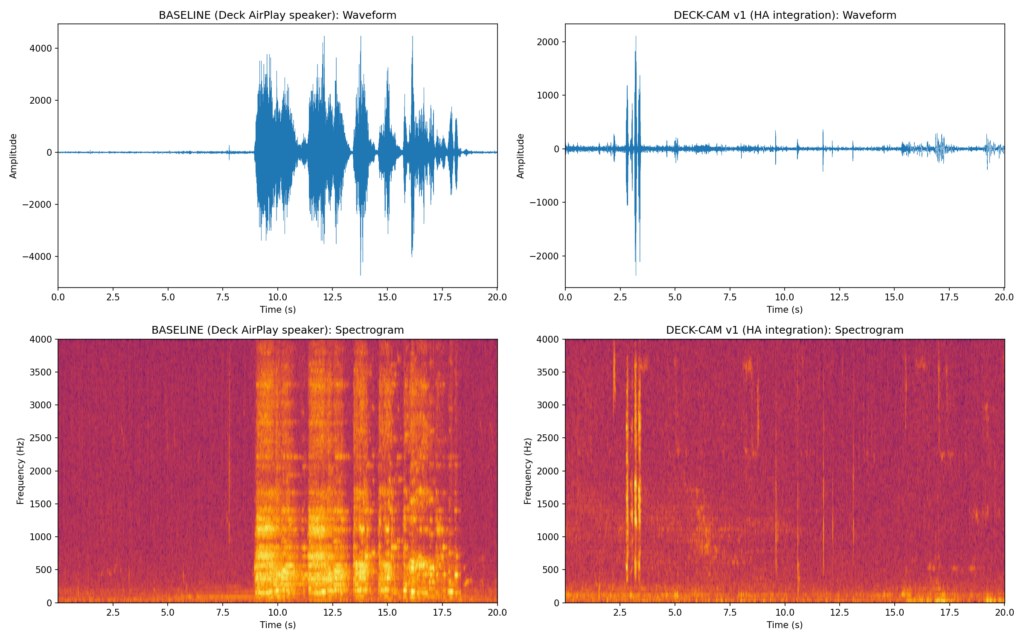
For reference, I played the Hallelujah sound effect through a high-quality AirPlay speaker (“Deck”) and recorded it on a nearby camera:

Baseline spectrogram from AirPlay speaker showing clean harmonic content
Baseline recording: Hallelujah played through an AirPlay speaker. Clear harmonic bands, good dynamic range.

Attempt 1: Through the Camera (Broken)

Here’s what the camera speaker produced with the original code:

Broken playback spectrogram showing compressed audio burst
First camera attempt: all audio compressed into a ~2 second burst at the end. The spectrogram shows broadband noise instead of harmonic content.

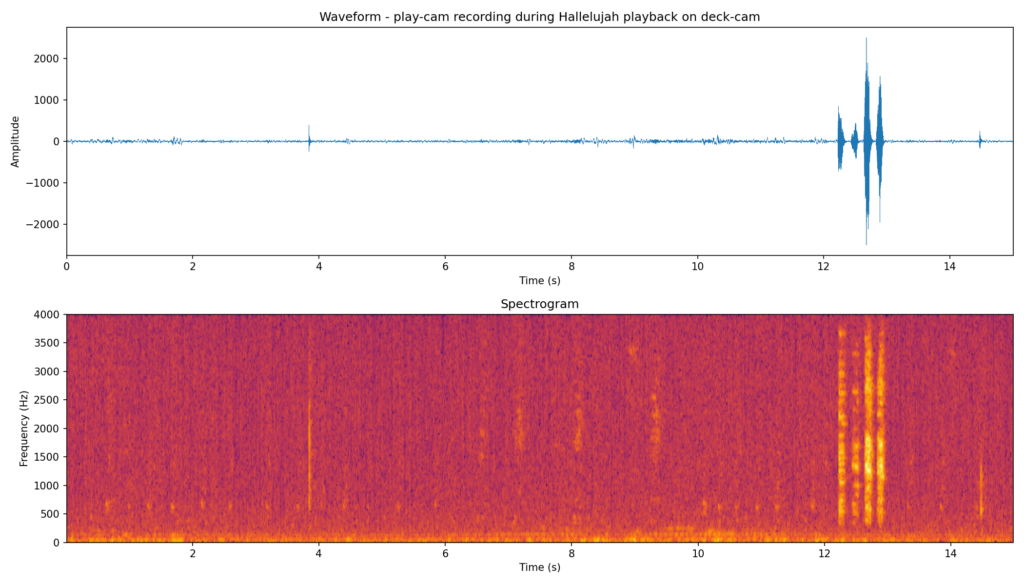
The entire clip was being dumped in a short burst. Clearly a pacing issue.

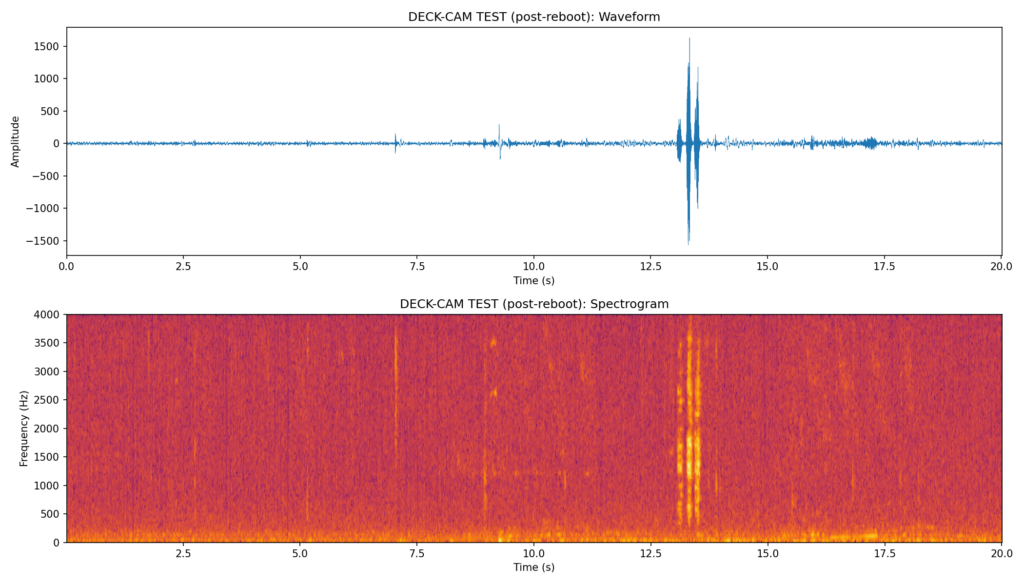
Attempt 2: After Reboot (Still Broken)

Post-reboot spectrogram still showing compressed audio
After camera reboot with audio enabled: still garbled. The pacing issue is in the software, not the camera.

Finding the Root Cause

The integration converts audio to AAC (8 kHz mono, 1024 samples per frame) and sends it via RTSP backchannel. The frame pacing code calculated the interval as:

frame_interval = duration / len(frames)

The problem: when audio is piped through ffmpeg (which is how the HA integration converts media files), ffmpeg doesn’t report a Duration: for piped input. So duration = 0, and frame_interval = 0. Every frame was sent instantly.

The Fix: Fixed Frame Interval

AAC at 8 kHz uses 1024 samples per frame. That’s a fixed interval:

frame_interval = 1024.0 / 8000.0  # 0.128 seconds per frame

No need to parse duration at all. Each AAC frame represents exactly 128ms of audio.

RTSP Backchannel Test (Fixed Pacing)

Testing with the test tone through the RTSP backchannel directly, with correct 128ms pacing:

Fixed backchannel test showing clear staircase frequency pattern
RTSP backchannel with fixed 128ms pacing: the C major staircase is clearly visible. Clean, correctly-timed playback.

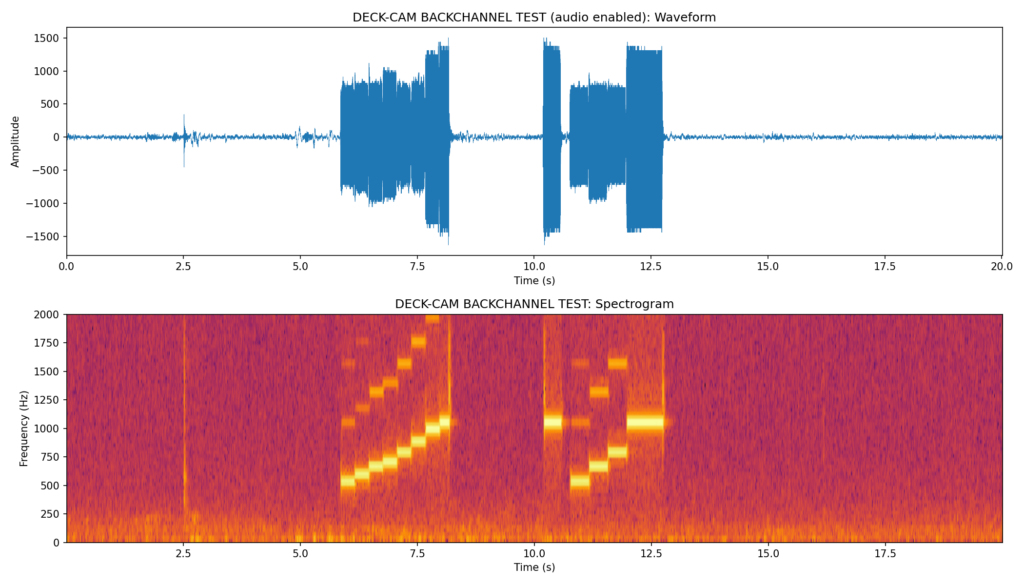
The staircase pattern is clearly visible—each note is distinct and properly timed.

Side-by-Side Comparisons

Here’s the before and after with the actual Hallelujah sound effect:

Side-by-side comparison of baseline AirPlay vs broken camera playback
Left: Baseline (AirPlay speaker). Right: Camera with broken pacing (v1). The camera version is compressed into a brief burst with no harmonic structure.
Three-way comparison showing baseline, broken, and fixed playback
Three-way comparison. Left: Baseline (AirPlay). Center: v1 with no pacing (all frames instant). Right: v2 with fixed 128ms pacing. The v2 spectrogram closely matches the baseline’s harmonic structure.

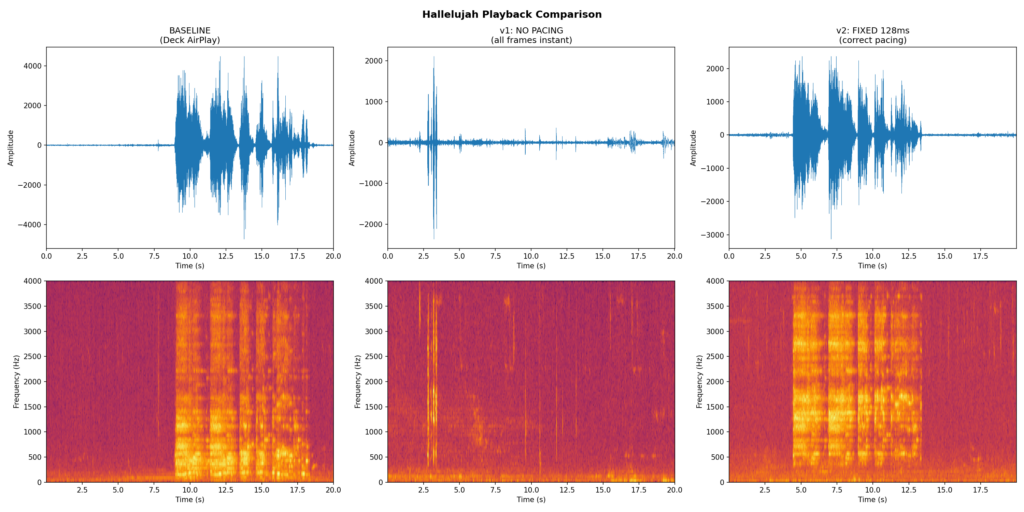
The v2 fix (right panel) closely matches the baseline (left panel). The harmonic content is clearly visible and properly spread across the full duration of the clip.

The Integration Changes

I contributed these fixes back to the Dahua integration:

  1. Fixed RTSP backchannel frame pacing: Use the mathematically correct 128ms interval (1024 samples / 8000 Hz) instead of trying to derive it from ffmpeg’s duration output.
  2. Audio encoding detection: At startup, the integration checks if AudioEnable is set on the camera’s encode config and logs a warning if not.
  3. enable_audio service: A new Home Assistant service on media player entities that enables audio encoding on the camera without needing to use curl or the camera’s web UI.
  4. Lorex compatibility: Lorex cameras (Dahua OEM) don’t support the audio.cgi HTTP endpoint. The integration detects this and falls back to RTSP backchannel automatically.

The Automation

With working speaker audio, the automation is straightforward. Each camera that can detect packages triggers the sound on its own speaker, throttled to once per hour per camera:

automation:
  - alias: Package Arrived play sound
    triggers:
      - entity_id: sensor.front_entry_package_count
        above: 0
        trigger: numeric_state
        id: front_entry
      - entity_id: sensor.garage_l_package_count
        above: 0
        trigger: numeric_state
        id: garage_left
      # ... more cameras
    actions:
      - condition: template
        value_template: >-
          {{ now().timestamp() - last_played > 3600 }}
      - action: media_player.play_media
        target:
          entity_id: "{{ speaker }}"
        data:
          media_content_id: media-source://media_source/local/Hallelujah-sound-effect.mp3
          media_content_type: music

Lessons Learned

  • Spectrograms are invaluable for audio debugging. They immediately show whether the problem is pacing, encoding, distortion, or something else entirely.
  • Record from a second camera to capture what the speaker actually outputs, rather than relying on subjective listening.
  • Fixed-interval pacing is more robust than duration-based calculation for streaming protocols. The math is simple: samples_per_frame / sample_rate = interval.
  • Check audio encoding first. On Dahua/Lorex cameras, the speaker won’t work unless AudioEnable=true in the encode config. This setting persists across reboots.
  • Lorex quirks: Lorex cameras are Dahua OEM but have different firmware. They don’t support audio.cgi but do support RTSP ONVIF backchannel. Some have flaky HTTP servers after soft reboots.

The complete code changes are in the Dahua integration fork, and the manual testing scripts (spectrogram generation, recording, analysis) are in the manual_tests/ directory.

Introducing Dahua MCP Server

I built an MCP server for managing Dahua and Amcrest IP cameras. It wraps the Dahua CGI HTTP API so that AI assistants like Claude can directly query, configure, and troubleshoot cameras through natural conversation.

Why

If you’ve ever managed a fleet of Dahua or Amcrest cameras, you know the drill: open the web UI for each one, click through menus, repeat fifteen times. The cameras have a powerful CGI API under the hood, but using it directly means remembering endpoint paths and crafting curl commands with digest auth. An MCP server sits in the middle — it handles the HTTP plumbing so an AI assistant can operate the cameras on your behalf.

This follows the same pattern as my LibreNMS MCP server for network monitoring. Purpose-built for management and troubleshooting tasks: checking settings, reading logs, changing configuration across devices.

What It Does

The server exposes 20 tools organized into five categories:

Camera Discovery

  • list_cameras — Returns all configured cameras (name, host, port). Every other tool takes a camera parameter that references these names.

System Information

  • get_system_info — Full system details (device type, serial, hardware/software version)
  • get_device_type — Camera model (e.g., IPC-HDW5831R-ZE)
  • get_software_version — Firmware version and build date
  • get_machine_name — Configured device name
  • get_serial_number — Hardware serial number
  • get_hardware_version — Hardware revision
  • get_vendor — Manufacturer (Dahua, Amcrest, etc.)

Configuration

  • get_config — Generic config reader for any named section (MotionDetect, Encode, Network, NTP, VideoInMode, and hundreds more)
  • get_motion_detection — Motion detection status and settings
  • get_video_in_mode — Day/night profile mode
  • get_encoding_config — Video encoding settings (resolution, bitrate, codec)
  • get_network_config — Network configuration
  • get_ntp_config — NTP time sync settings
  • set_config — Generic config writer for any key-value pair
  • enable_motion_detection — Toggle motion detection per channel
  • set_record_mode — Set recording to Auto, Manual, or Off

System Control

  • reboot — Reboot a camera
  • take_snapshot — Capture a JPEG snapshot from any channel

Logs

  • search_logs — Search device logs by time range and type. Wraps the three-step Dahua log API (startFind/doFind/stopFind) into a single call.

Multi-Camera, Single Server

One server instance manages all your cameras. You define them in a JSON config file:

{
  "cameras": [
    {"name": "front-door", "host": "192.168.1.108", "port": 80, "username": "admin", "password": "secret"},
    {"name": "backyard",   "host": "192.168.1.109", "port": 80, "username": "admin", "password": "secret"}
  ]
}

Every tool accepts a camera parameter to target a specific device. The server handles HTTP digest authentication and CGI response parsing per camera. If you are also managing your network with LibreNMS, you can create the settings file with the prompt:
Use LibreNMS to find all my Dahua cameras and generate cameras.json

Architecture

Built with Python and FastMCP, following the same architecture as the LibreNMS MCP server:

  • httpx with built-in DigestAuth — no custom auth code needed
  • Pydantic models for configuration validation
  • Read-only mode via middleware — disable all write operations with a single env var
  • Tag-based tool filtering — selectively disable tool categories
  • Dual transport — stdio for direct CLI use, HTTP for Docker deployment

Dahua cameras return key=value text responses rather than JSON. The server parses these into structured dictionaries automatically, stripping the table. and status. prefixes that litter the raw output.

Example: Standardizing the Maintenance Reboot Schedule

Here’s a real example of what this enables. I have 15 cameras and wanted them all rebooting weekly on Tuesday between 2–4 AM with no two cameras rebooting at the same time.

I asked Claude to check the current schedules across all cameras. It pulled the AutoMaintain config from each one and found several problems:

  • Two cameras had auto-reboot disabled entirely (west-lawn-cam, garage-cam)
  • Two cameras were set to the wrong day (one on Friday, one on Wednesday)
  • Three cameras were scheduled outside the 2–4 AM window (4:19, 4:27, 4:44)
  • Two pairs of cameras had identical reboot times, risking simultaneous reboots

Claude then set all 15 cameras to reboot on Tuesday, staggered 8 minutes apart:

CameraReboot Time
deck-cam2:00 AM
driveway-cam2:08 AM
front-entry-cam2:16 AM
front-lawn-cam2:24 AM
garage-cam2:32 AM
garage-left-cam2:40 AM
garage-right-cam2:48 AM
garden-cam2:56 AM
mailbox-cam3:04 AM
peach-tree-cam3:12 AM
play-cam3:20 AM
shed-cam3:28 AM
swing-cam3:36 AM
treeline-cam3:44 AM
west-lawn-cam3:52 AM

The whole operation — audit 15 cameras, identify problems, apply a corrected schedule, verify the changes — took one conversation. No web UIs, no curl commands, no spreadsheets to track what’s been updated.

Getting Started

The server runs as a standard MCP server over stdio or as a Docker container with HTTP transport:

# stdio (for Claude Code, etc.)
uv run dahua-mcp

# Docker
docker run -v ./cameras.json:/config/cameras.json:ro -p 8000:8000 dahua-mcp

Point your MCP client at it, call list_cameras to see what’s available, and start querying.